
Connect Omnivore to Woolworths MarketPlus
- You will need a Seller ID and Seller Token. The marketplace team will provide this when your selling account is set up
- To add the Seller ID and Seller Token to Omnivore go to Settings > Woolworths MarketPlace > General and enter them at the top of the page, then scroll down and click 'Update'.
Choose which products to list
- You will need to select a marketplace category for each product you want to list on the market. See Category Mapping for more instructions
- If there are products you don't want to list, you can either block them or simply not choose a category for them to list in. You can block a single product or exclude products by brand or keyword.
Woolworths MarketPlus’s GTIN/UPC policy
WMP requires valid GS1 GTINs to be provided to all products except in products where a GTIN has not been assigned. For variant products a unique GTIN should be assigned to each variant.
Images on Woolworths MarketPlus
The recommended image size is 800x800px. Note: Everyday Market has a minimum standard of 650x650px due to platform limitations.
Please review the WMP Product Image Requirements guide. Images are on page/slide 39.
Product Approvals
- When you first start selling on the marketplace, all products are reviewed and approved before they are live and available for sale.
- After you've completed your Omnivore set up, there will be a 'Start Selling' link at the top of the Dashboard - click this to send your products to the marketplace.
- Ask your Account Manager to review your products. To do this, raise an enquiry via the Woolworths MarketPlus Help Centre https://sellerhelp.woolworthsmarketplus.com.au/
Products Marked Listed but Not Live
A product marked Listed in Omnivore has been sent to Woolworths MarketPlus. It does not confirm that the product is live and available for sale on the marketplace.
Woolworths MarketPlus reviews and approves products before they go live. If a product is marked Listed in Omnivore but cannot be found on Big W, Everyday Rewards Shop and/or Everyday Market, contact Woolworths MarketPlus through their Seller Help Centre to ask about its approval status.
Omnivore will not show a listing error where the product has been sent successfully and is awaiting or subject to marketplace approval.
Pricing
- If you want to change the price of products you can create a promotion to increase or decrease the price of all products or a group of products.
Shipping & Delivery Times
At a minimum, you must have one Default Shipping option. You can set this up in Omnivore under Settings > Woolworths MarketPlus > Shipping. Your default shipping policy cannot use a product group.
Other options include:
- Standard and Express
- Shipping charged for every unit sold or ONE shipping charge for multiple items of the same unit
- Location based shipping charges; there are 19 pre-defined zones by postcode across Australia e.g Sydney Metro, NT Metro, NT Regional, ACT, etc
- Weight based shipping charges
- Price based shipping charges
- Rate Tables (set up by Woolworths MarketPlace)
- Delivery Times (Lead Time to Ship), also set up in the marketplace.
See the article Shipping Overview for more information.
NB: Your Account Manager at the marketplace will need to assist with setting up Rate Tables, Shipping zones and Delivery Times. This is a direct link to the My Shipping support section.
Stock Buffer
- Set up a stock buffer under Settings > Administration > Product Import if you carry low levels of stock and want to reduce the chance of overselling.
Before you click Start Selling in Omnivore
In Omnivore, the Woolworths MarketPlus Marketplace tab will display "Setup" in yellow until Start Selling is clicked.
These steps must be completed in Omnivore before Start Selling can be clicked.
- Check your marketplace Account is correctly set up.
- If you are already selling on the marketplace advise your Account Manager that you are migrating to Omnivore. They will advise on the next steps to keep your existing listings live if possible.
- Map your product to Categories
- Check your Shipping Templates are set up and complete
- Exclude any products you don't want to list.
- Check the Omnivore Dashboard under Listing Errors for products that won't list due to errors.
- Check you have put a date in the 'Do not import orders before this date' field.
- Check Woolworth MarketPlus for any relevant listing fees.
Articles for Setup
Woolworths MarketPlace Account Setup
Apply promotions to change the list price
Woolworth MarketPlus Shipping Setup Link
Overview of other settings
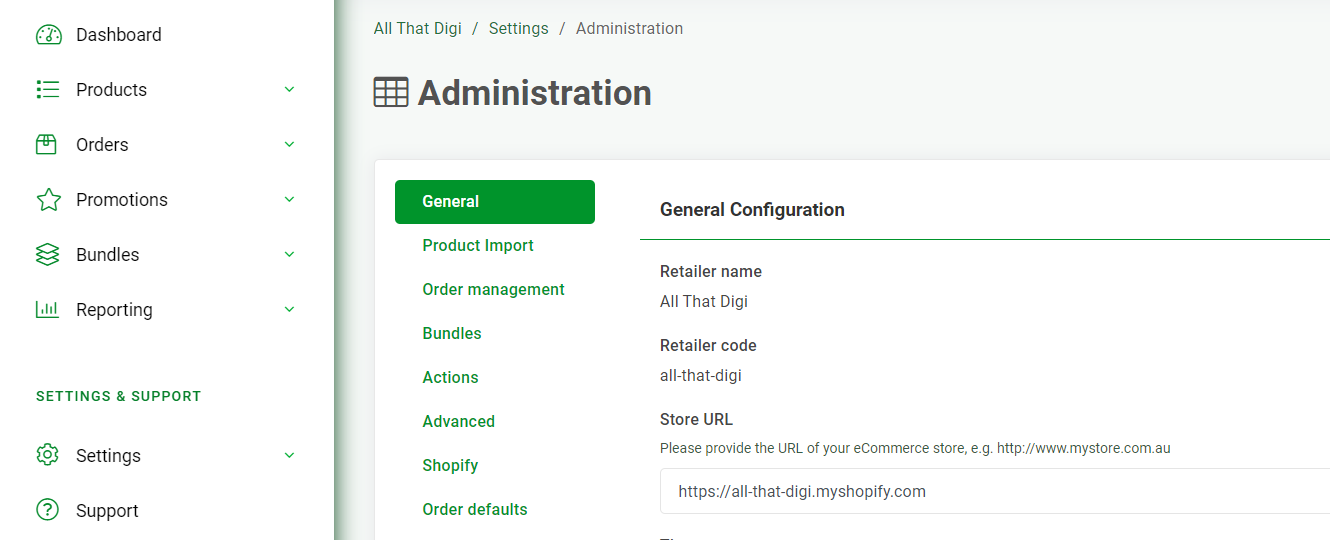
The Omnivore Settings, Functions and Features can all be accessed using the left-hand menu navigation. Over time you will get used to accessing these menus to make full use of the many features and functions of the Omnivore App.
Here is an overview:
- Settings, Marketplace Name (eg Woolworth MarketPlus), General: the settings on this page are specific to Woolworth MarketPlus - you can also the Woolworth MarketPlus integration on this page. If you change anything on this page an Upload to Woolworth MarketPlus will be required.
- Settings, eCommerce Platform Name (eg Shopify), General: the settings on this page affect the import feed from your eCommerce Store. Changes on this page will affect Woolworth MarketPlus and other marketplaces if you have them. If you change anything on this page an Import from your eCommerce Store (eg Shopify) will be required.
- Settings, Administration: this section relates to how we manage feeds, updates, orders and generic functions relating to the integration. Changes made in this section are specific to the overall Omnivore account and they will affect the Woolworth MarketPlus integration.
- Settings, Account Summary: this section is where you can view your invoices, general account summary, your contact information, and also notification information. Any changes made in this section won't need an update but you will need to click the update button on the page.
The screen capture below shows the left-hand menu options which also include how to access:
Products, Orders, Promotions, All Settings, and Support Articles. It also displays second-tier settings in the Administration Menu.
Now that you've completed this guide, explore the Features and Functions Guide Page
If you would like to contact our Support Team please click here.
If you would like to contact the Marketplace please click here. You will need log in to your WMP selling account.